Friday, January 30, 2009

Embarrassing Moments

Here's a good laugh for you all, unfortunately the joke was on me, but it's still funny- at least, everyone who works here seems to think so...
Any of you who try to help others with their computers will sympathize, I'm sure!

My colleague Bob (not his real name!) has a class in Wyoming next week, and they rented 4 laptop computers for him to bring along. Since he's leaving Sunday night, he's loading the software today. He started them all up, and since loading the different software on each one takes a while, he left them running while he went to lunch. When he came back, three of them had went into sleep mode, so he wiggled the mouse to get them going again, but nothing happened. He tried the power button, on each one, still they didn't wake up. I happened to walk by just then, and he asked me if I was familiar with these computers, and if I knew any other things to try to get them going again. I tried all the things I knew - the little indicator light on the front of the machine would flash, but that was it. We unplugged them, plugged them back in, nothing. We even tried taking the battery out, to try to force it to turn all the way off so we could turn it back on again - nothing! Our techy girl at the front desk, Daksha, looked up some info on what to do when you can't get a computer out of sleep mode, but none of that helped either.
Finally Bob called the guy we rented them from, and while he was talking to him I just happened to glance at the mess of cables and I couldn't quite see the light on the power strip. Hmmmm... So I went over and flipped it up - wouldn't you know, the switch was off! I said, "Hey, the power strip is off!" and uproarious laughter erupted from the other side of the cubicle walls.

I think we were set up!

There had been just enough juice in those computers' batteries for them to run for an hour or so, and then no one was there when the 'low battery' warning sounded.

The laughter has continued all afternoon...it makes for a nice atmosphere.
The moral of the story - when trouble-shooting computers, first make sure the power is on!


Wednesday, January 28, 2009

Correction on Subscription Benefits

Hello, everybody, I hope you're having a better day than I am. I want to always be accurate when I'm passing along information in this blog, so it really bothers me when I tell you the wrong thing. Let me apologize first, and then tell you the correction.
I'm sorry
On my December 18th entry, I stated that Home Use was only for commercial licenses. That's true, but government offices that buy AutoCAD, or the other Autodesk products, don't have a separate (different) kind of license. They are considered commercial licenses. People who work for government offices and are on Subscription CAN install a second copy of the software at home, if they use it to do work from that office.

That's all - everything else I stated in that blog entry is correct, and I did fix it so anyone happening upon it later will get the correct explanation.
Thanks for understanding...

Wednesday, January 21, 2009

Disappearing Ribbons

I received a question from Filipa from Portugal about what to do when the Quick Access Toolbar disappears, and I've had it happen too. In fact, I've opened AutoCAD 2009 and not had any toolbars show up! It kind of throws you off balance when that happens, but usually it's an easy thing to fix.
The first thing to do is open the CUI, and the easiest way to do that is to type CUI (and then of course hitting the Enter key) on the command line. In the upper-left panel, you'll see the word ACAD. Click on that, and right-click. You'll see a choice in the menu to Reset ACAD.cui. Pick that, and everything should reset itself to the way it's supposed to be.

If there's something terribly wrong, you may need to do a repair of your software. This is also quite easy. From your Start menu, find the Control Panel, and once you're there, select "Add and Delete Software"
You're not going to Uninstall at this point, so don't worry!
Find your Autodesk application in the list, once it eventually finishes populating itself.
Select the "Change/Remove" button. (I know it feels like you're going to lose your program, but you won't accidently delete it, so stay with me here.) That button brings up the menu pictured here, the Installation Wizard. Choose the Repair or Reinstall button, and it will repair most program errors - just like that!

As long as we're on the subject, I wanted to mention something about the .cui file, and avoiding possible problems. There are two things I always do before I start modifying any toolbars or workspaces or anything else. First I make a copy of the acad.cui file (and the same would go for any other Autodesk product, only the name would change, depending on what you have. Like you didn't know that! I apologize for stating the painfully obvious) I know there's a backup file, but I just like to save one in a completely different location.

If you don't know where your acad.cui file is stored, go to Options and pick the Files tab. In the Customization folder, you can see the path to where your program is looking for the .cui file. This is also where you would change it if needed - if the file you've been using becomes corrupt there is a file named acad.bak.cui in the same folder as the acad.cui file. You can browse and point to that file if your acad.cui gets corrupted somehow. Or you could do a "Repair" as outlined above.

The second thing I always do is save a copy of my Profile. (This doesn't exist in AutoCAD LT, so if that's your software, just skip this part.) This is done in Options, on the Profile tab. I usually make a copy of my profile right out of the box, and another after I've got things changed just the way I like them. That way, if I lose something or on the practically unheard of chance that I might mess something up, I can set my backup profile as the current one.
Both of these precautions have a drawback - you lose all the customization you did after you saved the backup copy. However, if it's a matter of your program not working at all versus not having a few favorite tools, I'd rather be set back to my original install than not be able to work at all.

And of course, there's nothing preventing you from making new backup copies of your .cui file and your Profile once you have them fixed up the way you like. Better safe than sorry, like my Grandmother would say.

Wednesday, January 14, 2009

Building Dynamic Blocks

I have been working on a custom class called Advanced Blocks, it'll have elements from level 2 & level 3 classes. In that class I'm going to be showing people how to add attributes to blocks, how to extract them, and how to add Dynamic functions to blocks. With this in the back of my mind, I was looking through my archives and I realized that I haven't written about Dynamic Blocks yet.

So let me start out with something easy, and you can build on it from there. You could even call it building blocks...

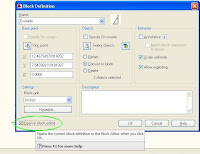
When you first create a block, there is a an additional checkbox marked "Open in Block Editor", it's only been there since AutoCAD 2006. (I mentioned the block editor when I wrote about how you could edit blocks in AutoCAD LT without exploding them. Creating Dynamic Blocks is actually the original intended use for the Block Editor) Anyhow, check that box and as soon as you hit OK you'll be inside the Block Editor.

I drew a triangle with a circle on top of it and made that into a block, just for something to work with that was simple enough that you all could imagine it being something else, something you could use.

To give a block Dynamic Functions, and that cool lightning bolt in its preview, you need to add a Parameter, and to that Parameter you add an Action. That's about it, really. Let me show you with my simple shape here.
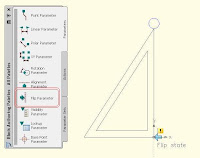
I chose the Parameters tab of the Dynamic Blocks Palette, and from the list I picked " Flip Parameter". Inserting this Parameter is a 2-click process. On my block I picked the edge where I want it to flip, and then picked directly above it to determine the direction it would go- in this case, my block will flip on a vertical axis. If I had picked a point to the right or left, the triangle would have flipped up and down.


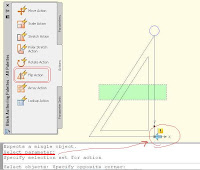
The next step is to add a Flip Action to the Flip parameter (these two work together). Select the Flip Action from the palette; your command line will tell you to select a parameter. The Parameter is showing an exclamation mark until you give it an Action, so it's kind of hard to miss. Once you pick it, you're prompted to select the objects you want to flip. In this picture I'm selecting the 2 triangles. Then you just need to place the action someplace near the flip arrow.

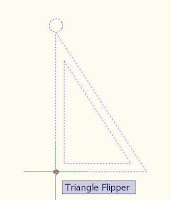
Next, I selected the Parameter and opened up the Properties Palette. Under the Heading "Property Labels", I edited the Flip Description to read "Triangle Flipper". Whatever you type there is what you'll see when you hover over corresponding grip, in this case the flip grip.


I usually save and close the block at this point, and test it out in my drawing. It works!


Now, just for fun, I'm going to make that circle on top scalable, as if it might need to be adjustable. I double-click on the block ( that will open the Block Editor) and click OK after I check to make sure the correct block name is in the dialog box.
First I add a Linear Parameter, from the bottom quadrant of the circle to the top.

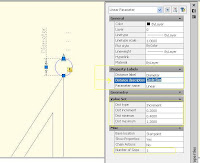
I'm adjusting it's Properties as you can see from the picture, very similar to what I did with the Flip parameter. This time, however, I want to adjust the Value Set - I set the Distance Type to Increments, the Distance Increments to 0.2, Minimum to 0.4, and Maximum to 1.2. This defines the sizes that my circle can become.


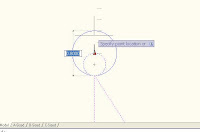
Next I add a Scale Action to the Linear Parameter, the one I renamed 'Diameter'. When I add the Action, I pick the circle when my command line asks me to Select objects, and then of course hit "Enter" to end the selection process.


Pick a spot for the Scale Action to sit, and you're done!

Save, close the block editor, and insert a few of your new fancy dynamic blocks to test them out.
In the picture on the right, I'm showing how the circle size can be adjusted. It works perfectly, just the way I wanted it to!


I hope this give you some idea of how easy it is to add Dynamic Functions to a block, and also that it gives you some ideas of how you could build some of your own. If AutoCAD has a Fun part, I promise you, this is it!