Because there are so many people who are not our customers who have clicked on this blog, I thought it would be helpful to them if I put down the dates that all the versions of Autodesk Software would be released. This is for North America, so if you don't live there, adjust according to what you have experienced in the past.
Some of these dates have already passed, so you might want to call a reseller if you're looking for this software and you haven't gotten it yet.
Product - Release Date
Autodesk® Ecotect™ Analysis 2010 - March 17
AutoCAD® 2010 - March 24
AutoCAD LT® 2010 - March 24
AutoCAD® RealDWG™ 2010 - March 24
AutoCAD® Electrical 2010 - March 24
AutoCAD® Mechanical 2010 - March 24
Autodesk® Inventor LT™ 2010 - March 24
AutoCAD® Inventor LT™ Suite 2010 - March 24
AutoCAD® Inventor® Suite 2010 - March 24
AutoCAD® Inventor® Professional 2010 - March 24
AutoCAD® Inventor® Professional Suite 2010 - March 24
AutoCAD® Inventor® Routed Systems Suite 2010 - March 24
AutoCAD® Inventor® Simulation Suite 2010 - March 24
AutoCAD® Inventor® Tooling Suite 2010 - March 24
Autodesk® DirectConnect for Catia 2010 - March 24
Autodesk® DirectConnect for Catia 4 2010 - March 24
Autodesk® DirectConnect for JT 2010 - March 24
Autodesk® DirectConnect for UG 2010 - March 24
Autodesk® SketchBook® Pro 2010 - March 24
AutoCAD® Architecture 2010 - March 25
AutoCAD® MEP 2010 - March 25
AutoCAD® Map 3D 2010 -March 30
Autodesk MapGuide® Enterprise 2010 - March 30
AutoCAD® Inventor® Tooling Suite 2010 - April 1
Autodesk® Navisworks® Manage 2010 - April 3
Autodesk® Navisworks® Review 2010 - April 3
Autodesk® Navisworks® Simulate 2010 - April 3
Autodesk® 3ds Max® 2010 - April 8
Autodesk® 3ds Max® Design 2010 - April 8
Autodesk® Alias® Automotive 2010 - April 8
Autodesk® Alias® Design 2010 - April 8
Autodesk® Alias® Surface 2010 - April 8
Autodesk® Showcase® 2010 - April 8
Autodesk® Showcase® Presenter 2010 - April 8
Autodesk® Showcase® Professional 2010 - April 8
Autodesk® Inventor® Automation Professional 2010 - April 10
AutoCAD® Visualization Suite 2010 - April 13
Autodesk® Navisworks® Manufacturing Manage 2010 - April 14
Autodesk® Navisworks® Manufacturing Review 2010 - April 14
Autodesk® Navisworks® Manufacturing Simulate 2010 - April 14
Autodesk® Topobase™ Client 2010 - April 15
Autodesk® Topobase™ Web 2010 - April 15
Autodesk® Vault Collaboration 2010 - April 15
Autodesk® Vault Manufacturing 2010 - April 15
Autodesk® Vault Workgroup 2010 - April 15
AutoCAD® Revit® Architecture Suite 2010 - April 16
AutoCAD® Revit® Architecture Visualization Suite 2010 - April 16
AutoCAD® Revit® MEP Suite 2010 - April 16
AutoCAD® Revit ®Structure Suite 2010 - April 16
Autodesk® Revit® Architecture 2010 - April 16
Autodesk® Revit® Structure 2010 - April 16
Autodesk® Robot™ Structural Analysis 2010 - April 16
Autodesk® Robot™ Structural Analysis Professional 2010 - April 16
AutoCAD® Civil 2010 - April 17
AutoCAD® Civil 3D® 2010 - April 17
AutoCAD® Raster Design 2010 - April 20
Autodesk® Quantity Takeoff 2010 - April 20
AutoCAD® P&ID 2010 - April 22
Monday, April 13, 2009
Friday, April 10, 2009
When Do I Get My New Software?
 Hello, folks. If you're on Subscription, here are the dates when your next Autodesk products (the ones that we sell here at Comm-Tech) will be mailed out. This applies to North America only:
Autodesk 2010 Products Launching - First Customer Shipment dates
AutoCAD® 2010 --March 24
AutoCAD LT® --2010 March 24
AutoCAD® Map 3D 2010 --March 30
Autodesk MapGuide® Enterprise 2010 --March 30
Autodesk® Navisworks® Manage 2010 --April 3
Autodesk® Navisworks® Review 2010 --April 3
Autodesk® Navisworks® Simulate 2010 --April 3
Autodesk® 3ds Max® Design 2010 --April 8
Autodesk® Topobase™ Client 2010 --April 15
Autodesk® Topobase™ Web 2010 --April 15
Autodesk® Vault Collaboration 2010 --April 15
Autodesk® Vault Workgroup 2010 --April 15
AutoCAD® Civil 2010 --April 17
AutoCAD® Civil 3D® 2010 --April 17
AutoCAD® Raster Design 2010 --April 20
If you're on subscription and you don't receive your software within a week of these dates, please call your Reseller and they can help you find out what's going on.
Cheers!
Friday, April 3, 2009
Another Way to Save Customizations
Hello again, I hope this note finds you all in a good mood. Here in Boulder it's a beautiful sunny morning, but we're supposed to get another snowstorm tonight that could continue into tomorrow. At least tomorrow there won't be as many people who have to get to work, so there won't be as many idiots - those who refuse to slow down! - sliding into the ditches.
I think you'll like this little tip. I have explained previously about saving your .cui file, and how that's where your custom settings live. Well, that wasn't wrong exactly, but I found out there's a better way, thanks to the Techs at Autodesk.
Have you ever noticed that when you install a new version of an Autodesk product, a message pops up telling you it noticed you have a previous version and would you like to migrate your custom settings?
I love how computers can be so polite.
What I found out was that you can use that function at any time, to save any custom settings you have. It's better and safer than depending on your acad.cui file to keep any custom toolbars safe. How this came about was a man called who had copied his .cui file from one computer to another and lost his custom toolbar names. They were still there, only it was hard to find them, and they were renamed "Toolbar 1","Toolbar 2", and so on.
What I found out was that you can use that function at any time, to save any custom settings you have. It's better and safer than depending on your acad.cui file to keep any custom toolbars safe. How this came about was a man called who had copied his .cui file from one computer to another and lost his custom toolbar names. They were still there, only it was hard to find them, and they were renamed "Toolbar 1","Toolbar 2", and so on.
So, here's another way to save your custom settings and avoid the problem this gentleman came up against.
 In your Start menu ( sorry I don't know where to start in Vista, but if you've gotten proficient at using that OS I bet you'll be able to figure this out) go to All Programs, then find Autodesk, and then whichever version you customized. Notice the menu in the picture. From here you can both save your custom settings by exporting them, and you can import custom settings from previous versions.
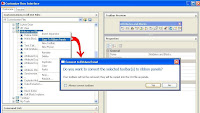
You'll get this little warning, as shown on the right here. Notice that you can choose to save settings that 'live' on your network.
Doing this creates a .zip file, just pay attention to where you save it!
Then some day when you want to restore those settings, just reverse the process. Go to the Start menu as before, and in the Autodesk program you want to import to, select "Migrate Custom Settings". Browse to the zip file you created earlier, and it imports them.

At the end you get a report of what was installed and what doesn't work. I had a few error messages, mostly that access to the font files was denied, and then General Information and Migration Details.
This is a better way to have all your custom toolbars, icons, etc, safe and in a way that you can surely get them back again. The thing about this that I never thought of before is that you can use it to save and move custom settings from one machine to another, besides the normal function of using it to migrate custom things from one version to another.
Have a nice Spring day! I hope the weather is getting nice, wherever you happen to live. And for anyone who lives south of the equator - enjoy your Autumn. It's my favorite season.
Thursday, March 26, 2009
Changes in the weather
Hi all! This is a little note totally off the subject of AutoCAD - I like to talk about the weather once in a while. Especially when it's so dramatic!
The weather service had been telling us a big snowstorm was coming, and this time they were exactly right.
It was a beautiful day yesterday, just like spring. When the front started rolling in I took a photo of the clouds, they looked too pretty to be real. Here it is, taken out of my office window. You can see the clouds all in a row.
The second photo and the video are from today.
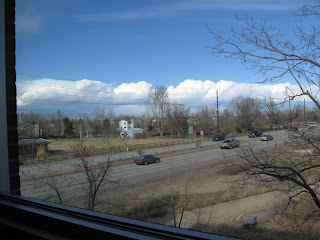
 What a change!
Tuesday, March 24, 2009
Putting Annotative Objects to Work
 Yesterday I did a review of how to create Annotative Styles, in Text, Dimensions and Multileaders. It's pretty obvious that these styles are worse than useless if you don't know how to use them, so let's get right into that.
You can put Annotative Dimensions, Text and Multileaders in your drawing either in Model space or Paper Space through a scaled viewport. The benefit of putting these objects in through a viewport that has already been scaled is that you are already sure what your viewport scale is going to be, so you don't have to wonder. Also, you won't forget to set the scale, which frequently happens when adding Annotative Objects while in Model space.
That being said, most people I talk to put their notes and dimensions on their drawing long before they get it set up to print, so we need to look at both ways of doing this.
 In Model Space, before you add notes or dimensions, choose the scale at which you want these objects to plot. In the lower-right corner of your screen, on the status bar, you can see the current scale. If you've never changed it, the default is 1:1. In the picture I've selected the flyout arrow, my current scale is 1/4"-1'-0", and I'm about to change it.
Notice the little button to the right of the Annotation Scale button. It is the Annotation Visibility button, and it controls whether you can see every Annotative object (ON) or only the ones that have the current scale (OFF). When you click this button, the light bulb changes from lit up (on), to dark grey (off), and on your command line you'll see
Command: ANNOALLVISIBLE
Enter new value for ANNOALLVISIBLE <0>: 1
If you prefer, you can type that command in, so then you need to know that 1=On, 0=Off
Take a look at these pictures, and notice how in the one with the light bulb icon 'on', you can see dimensions and notes of different sizes, but when the light goes dim, you can only see Annotative objects that have the current scale assigned to them:


In this next picture, notice how it looks when I leave the light bulb off and change the current scale in the list.

All the Annotative items created at the scale of 1:10 no longer show, and the ones with the 1:20 scale assigned to them are now visibile.
 If you need certain Annotative objects to show in more than one scale, there are several ways you can make that happen. My first choice when I'm in Model space is to select the objects to which I want to add a scale, right click, and select either "Add current scale" - that's pretty self-explanatory - or select "Add/Delete Scales". You can add one or more scales to all the annotative
  objects you've selected.
As you can see from the picture above, they can be different types of objects and it still works. After you do this, these will all show up in any viewport that has that scale assigned to it. From this same menu, you can also delete any assigned scales. The Delete button is right below the Add button.
 Another way to add scales to Annotative objects is with the ANNOAUTOSCALE command. It's the button in the picture - but be very careful with this button! If you have this on, as it looks in the picture, and you change the scale showing on the status bar, it will add the new scale to EVERY Annotative object you have! Everything, even if it's on a frozen or locked layer.
See the mess I made with this button! The Dimension layer was frozen,
 and the Notes layer (red) was locked. Thanks be that there is an "Undo" button!!
Another way to create Annotative text, dimensions or multi-leaders is to first set up your sheets, create the viewports you need, set their scales and lock them. Then on your layouts, double-click inside any viewport to put yourself in Model Space. When you put notes or dimensions in your drawing this way, they automatically are created at the proper scale.
In this last picture, the Annotative text, dimensions and multileaders were put in through the viewports. You can really see the benefit of using Annotative text (I HOPE!) because even though
 these viewports are at different scales, the dimensions in each one print out at the same size, as do the room names. You may notice that the room names have two scales assigned to them, so they show up in both viewports. Nevertheless, I was able to adjust the position of each word so it fit in the room.
I truly hope this was helpful to someone out there who is trying to figure out how to work with Annotative Objects!
Monday, March 23, 2009
Annotative Objects Revisited
 Since Annotative objects became part of AutoCAD in the 2008 version, there have been some changes, mostly simply in how it looks when you're using them. I'm going to go through the basics again of how to use annotative text, dimensions and leaders ( called Multileaders now ). In my humble opinion, this was the best thing to come out of the 2008 release. If you ever print out your project with viewports at different scales, you will be so happy if you learn how to use annotative objects! This is one problem everyone has been struggling with since day 1. (well, everyone who printed any part of their project at a different scale than the rest of it) But now - Problem Solved!
First of all- Annotative Text, Dimensions and Multi-leaders work best if you create an Annotative Style. Any style you already use can be made into an annotative style.
 In 2009 AutoCAD, if you're using the ribbons, on the 2D workspace Home tab there is a panel named Annotation. If you click the flyout for that ( the black triangle) you'll be able to edit or create text, dimension and multileader styles. In the picture I highlighted where you would click on each of those, in blue. (You cannot highlight them all the way I showed here. I did some copy and paste to make it look that way).
In 2008 or 'classic' AutoCAD, you get to the styles in the Format pulldown menu.
 You can tell right away when you open any of the style managers whether a particular style is annotative or not.
To make an existing style annotative:
 For Text styles, select the style you want to make Annotative. In the dialog box click on the box in front of the word "Annotative". Click "Apply".
 For Dimension styles, choose the style you want to change, then select "Modify". Go to the 'Fit' tab, and check the "Annotative" box. Select "OK" to save the changes.
 For Multileader styles, choose the style you want to change, then select "Modify". Go to the "Leader Structure" tab, and check the "Annotative" box. Select "OK" to save the changes.
When you're creating a new style, you'd do the exact same thing as above, at the time you are in the process of creating the style.
To create a new text style, in the style dialog box select 'New'. Give your new style a name, choose a font from the pulldown list, check the 'Annotative' box, and click "Apply".
To create a new dimension style, in the Dimension Style manager select 'New' and give it a name in the box that pops up. Go through the steps to choose how you want your dimension style to look, and when you get to the 'Fit' tab, choose "Annotative".
To create a new Multileader style, in the Multileader Style Manager, select 'New', then decide what kind of leader format you want, and whether you want it use Mtext or a block in the Content tab. Then in the 'Leader Structure' tab, be sure to check the box for "Annotative".
Now you've got it!
Not sure what do do with it?
Tune in tomorrow to find out how the Annotative Objects work. Same time! Same channel!
Friday, February 27, 2009
Creating a Ribbon from a Toolbar
Recently when I right-clicked on a toolbar in the CUI, I noticed that I could create a Ribbon right there. I thought that would be a pretty cool way to customize - but there are a few pitfalls you might want to be aware of! 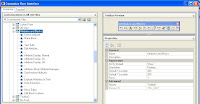
So, to start off I created a custom Toolbar with a bunch of commands I wanted to use all together.
(This is really an easy process. 1. Right-click on the Toolbars node in the CUI. 2. Choose New Toolbar 3. Right-click on the new toolbar to rename it 4. Find commands you want in the Command window at the bottom of the CUI, and drag them onto your new toolbar. 5. If you want separators, like I have, just right-click again on the toolbar and choose "Add separators" from the list)
Once my toolbar was created, I right-clicked on it and chose "Create Ribbon from Toolbar"
 custom toolbar, even if you go into the properties of the buttons of that ribbon, and make them "Large", they just don't change. Not on my machine anyhow!! I tried over and over, NOTHING.
However, when you drag a command onto a new or existing ribbon, you then can determine it's size. It's one of the settings in the panel on the right side. So if you create your own custom ribbons from scratch, you can set the button size.
Have fun customizing! I'm enjoying playing with the ribbons in the 2009 interface, I hope you are too.

So, to start off I created a custom Toolbar with a bunch of commands I wanted to use all together.
(This is really an easy process. 1. Right-click on the Toolbars node in the CUI. 2. Choose New Toolbar 3. Right-click on the new toolbar to rename it 4. Find commands you want in the Command window at the bottom of the CUI, and drag them onto your new toolbar. 5. If you want separators, like I have, just right-click again on the toolbar and choose "Add separators" from the list)
Once my toolbar was created, I right-clicked on it and chose "Create Ribbon from Toolbar"

Here's my new ribbon - it doesn't look like much, does it?  I tried clicking the "Apply" button but it didn't make my buttons show in the preview. If you want a preview of your new Ribbon, close the CUI and then open it again, and you'll see how all the buttons look on it when you select it from the list in the left hand panel.
So the next step would seem to be to assign this ribbon to show up in one of the tabs, right? Right! That's just a simple matter of finding your ribbon in the list of ribbons, and dragging it up onto whichever tab you want it to show up in.
 I tried clicking the "Apply" button but it didn't make my buttons show in the preview. If you want a preview of your new Ribbon, close the CUI and then open it again, and you'll see how all the buttons look on it when you select it from the list in the left hand panel.
So the next step would seem to be to assign this ribbon to show up in one of the tabs, right? Right! That's just a simple matter of finding your ribbon in the list of ribbons, and dragging it up onto whichever tab you want it to show up in.
Once you drag a ribbon in to one of the tabs, it will show up in that tab no matter which Workspace contains that particular tab.
You can right-click on any ribbon panel and uncheck any panel from the list, if you don't want it to show. That setting would be saved per Workspace.
In order to see your new ribbon, close the CUI, and make sure to select the correct tab. 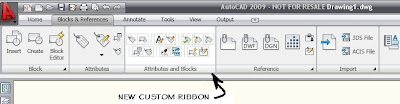
What you'll notice right away is that the ribbon you created from the toolbar has all small buttons. I spent a lot of time trying to change the button sizes, and what I found is, you just can't. If you create a custom ribbon from a  custom toolbar, even if you go into the properties of the buttons of that ribbon, and make them "Large", they just don't change. Not on my machine anyhow!! I tried over and over, NOTHING.
However, when you drag a command onto a new or existing ribbon,
 you then can determine it's size. It's one of the settings in the panel on the right side. So if you create your own custom ribbons from scratch, you can set the button size.
Have fun customizing! I'm enjoying playing with the ribbons in the 2009 interface, I hope you are too.
Subscribe to:
Posts (Atom)


