Showing posts with label annotative. Show all posts

Tuesday, March 24, 2009

Putting Annotative Objects to Work

Yesterday I did a review of how to create Annotative Styles, in Text, Dimensions and Multileaders. It's pretty obvious that these styles are worse than useless if you don't know how to use them, so let's get right into that.
You can put Annotative Dimensions, Text and Multileaders in your drawing either in Model space or Paper Space through a scaled viewport. The benefit of putting these objects in through a viewport that has already been scaled is that you are already sure what your viewport scale is going to be, so you don't have to wonder. Also, you won't forget to set the scale, which frequently happens when adding Annotative Objects while in Model space.
That being said, most people I talk to put their notes and dimensions on their drawing long before they get it set up to print, so we need to look at both ways of doing this.
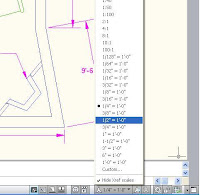
In Model Space, before you add notes or dimensions, choose the scale at which you want these objects to plot. In the lower-right corner of your screen, on the status bar, you can see the current scale. If you've never changed it, the default is 1:1. In the picture I've selected the flyout arrow, my current scale is 1/4"-1'-0", and I'm about to change it.


Notice the little button to the right of the Annotation Scale button. It is the Annotation Visibility button, and it controls whether you can see every Annotative object (ON) or only the ones that have the current scale (OFF). When you click this button, the light bulb changes from lit up (on), to dark grey (off), and on your command line you'll see
Command: ANNOALLVISIBLE
Enter new value for ANNOALLVISIBLE <0>: 1

If you prefer, you can type that command in, so then you need to know that 1=On, 0=Off
Take a look at these pictures, and notice how in the one with the light bulb icon 'on', you can see dimensions and notes of different sizes, but when the light goes dim, you can only see Annotative objects that have the current scale assigned to them:


In this next picture, notice how it looks when I leave the light bulb off and change the current scale in the list.


All the Annotative items created at the scale of 1:10 no longer show, and the ones with the 1:20 scale assigned to them are now visibile.
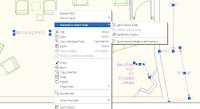

If you need certain Annotative objects to show in more than one scale, there are several ways you can make that happen. My first choice when I'm in Model space is to select the objects to which I want to add a scale, right click, and select either "Add current scale" - that's pretty self-explanatory - or select "Add/Delete Scales". You can add one or more scales to all the annotative objects you've selected.
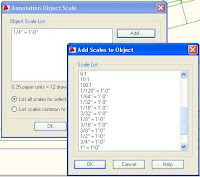

As you can see from the picture above, they can be different types of objects and it still works. After you do this, these will all show up in any viewport that has that scale assigned to it. From this same menu, you can also delete any assigned scales. The Delete button is right below the Add button.
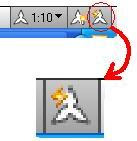

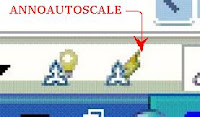
Another way to add scales to Annotative objects is with the ANNOAUTOSCALE command. It's the button in the picture - but be very careful with this button! If you have this on, as it looks in the picture, and you change the scale showing on the status bar, it will add the new scale to EVERY Annotative object you have! Everything, even if it's on a frozen or locked layer.


See the mess I made with this button! The Dimension layer was frozen, and the Notes layer (red) was locked. Thanks be that there is an "Undo" button!!
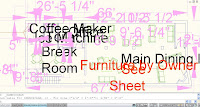


Another way to create Annotative text, dimensions or multi-leaders is to first set up your sheets, create the viewports you need, set their scales and lock them. Then on your layouts, double-click inside any viewport to put yourself in Model Space. When you put notes or dimensions in your drawing this way, they automatically are created at the proper scale.
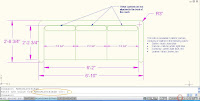
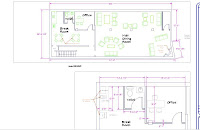
In this last picture, the Annotative text, dimensions and multileaders were put in through the viewports. You can really see the benefit of using Annotative text (I HOPE!) because even though these viewports are at different scales, the dimensions in each one print out at the same size, as do the room names. You may notice that the room names have two scales assigned to them, so they show up in both viewports. Nevertheless, I was able to adjust the position of each word so it fit in the room.

I truly hope this was helpful to someone out there who is trying to figure out how to work with Annotative Objects!

Monday, July 2, 2007

Saving Back with Annotative Styles


I received a question about what happens to these annotative objects when you have to send your drawing to someone with an older version of AutoCAD. A really good question, and one I'd want to know the answer to before I started making all new styles of text and
dimensions. Happily, the answer is short and easy.


Here is the example drawing I'll be using. I made some text and dimensions that only had one scale, and some that had several. Then I saved it back to a 2004 type file, and went and opened it in AutoCAD 2006.

As you can see, when you look at all the viewports in paperspace, it's almost perfect! The only thing you lose is the layer color or linetype per viewport. But everything is showing only in the viewports it's supposed to, and at the right scale.


You can see why - AutoCAD copied my layers and added the appropriate scale factor to the layer name. How clever is that? You can also see that the correct layers are frozen per viewport - so it all works, and someone can view your drawing in an older version. (by the way, if you save as an older version and then just open it in 2008, it doesn't do this. It looks just the same.)


The next logical question is, "What do these annotative objects become? Can I still edit the text, or change a dimension?"
In Model space, you can see everything all at once, so it looks a little confusing. When you click on an object that had several scale factors attached to it, you'll see that each size is there and they're all one object -they've been made into a block.


In the example, I exploded the block and it turned back into two dimensions. Instead of creating new dimension styles, Style Overrides are added. I chose both dimensions, did LIST, & took a picture of this so you could see it. (notice the dimscale)


Hopefully, this will increase your confidence in using the new annotative text. You can save back to earlier versions and still work with the objects formerly known as Annotative.

Monday, June 25, 2007

Getting Annotative Objects Right!

We're back from our 2008 Roadshow, demonstrating the new features of AutoCAD 2008 in Denver, Frederick, Cheyenne, Colorado Springs and Pueblo. It went very well, thanks to all of you who attended. In the fall we're traveling to the western slope to demonstrate out there.

I promised to talk a little bit more about Annotative Objects, so here we go.....

This time let's look at some of the pitfalls that can come upon you when adding Annotative objects from Model Space.

First of all, the best practice is to set the scale at which you want your annotative object to display right away, before you start the command. Even though you'll get a reminder screen asking you to set the scale, it's happened to me more than once that the text I put in there doesn't get the message and winds up still showing at 1:1 (meaning 1/8" tall in this example, whatever you set as the Paper space text height in the text style). If I go to add or delete scales, I can see that it thinks it's displaying at 1/8"=1', but it's not. So it will be a good habit in 2008 to always check the bottom right of your status bar before you put any annotations in. This will be on the test, so remember it.

Just in case you forgot AutoCAD 101, the status bar is that very thin bar at the bottom underneath the command line, where you turn off DYN and turn on POLAR.


I added some annotative dimensions after setting my scale to 1/2"=1'-0" on the status bar. Looking at this drawing in Paper space, you can see that the text is showing in the correct viewports and everything is the right size.


Here is where the errors will occur:

These two buttons are the ones you have to be careful of. In this picture, they are both 'off''. They both represent system variables, one on the left toggles whether all annotations are visible, or only the ones of the current scale. The command is actually ANNOALLVISIBLE; when set at 0, only the annotations of the current scale show, and the little lightbulb on the icon is dark. When you toggle it, that sets it to 1, and you can see all the annotations of each scale, as in the following picture.


The other button, on the right, is ANNOAUTOSCALE, and it can be set to a negative or positive number, to add quickly another scale to your annotations.

For example, I need another viewport with 1/4" scale, without the existing note & dimensions. Just to show you what can happen when you have the right side button on, (showing the lightning bolt symbol 'on', or yellow), I turned that on (changing the setting from 4 to -4) and in Model space, changed the annotative scale to 1/4"=1'-0". Immediately it added that scale to all my existing text and dimensions.

This was not exactly what I had in mind!

So be careful of that last little button! If it's on, and you just switch over to a different scale setting to see how things look, you could add that scale to every annotation you have.

There are 8 different setting for this system variable:

1 Adds the new scale to all annotative objects except those on layers that are off, frozen, locked or set to Viewport Freeze
2 Adds the new scale to all annotative objects except those on layers that are off, frozen or set to Viewport Freeze
3 Adds the new scale to all annotative objects except those on layers that are locked.
4 Adds the new scale to all annotative objects

-1, -2, -3, and -4 Do not add the new scale, and they all return the setting back to their corresponding positive number if you just toggle it. Make sure you look at the command line to see which setting you've got when you use this button!

There's a very old saying, "Forewarned is forearmed". I'm hoping that showing you how these two buttons work will help everyone avoid frustration and encourage you all to use the wonderful new annotative objects in AutoCAD 2008.

See you next time!

Wednesday, June 6, 2007

New Annotative Dimensions in 2008


Annotative Dimensioning works pretty much the same as Annotative Text, but while playing with it I've noticed a few things that can be a little confusing.

( a little confusing?)

So hopefully after reading this, some of the fog will clear away, and this new feature will make your life as much easier as you were anticipating. No more extra layers for every viewport scale!! No more worries about forgetting to turn off or on the correct layer per viewport!
To create an annotative dimension style from an existing style, do the usual steps to create a new style, and start with one you use all the time. In your Dimension Style Manager, on the Text tab, the text height will be the height you want it to print in Paper Space. On the Fit tab, where you have always put in the scale factor there is now a choice for Annotative. Just check that box and there you have it, a new annotative dimension style.


A little note about naming these styles - the new annotative symbol shows up in the Styles toolbar pulldown list in front of the style name, so you'll know right away whether you're choosing an annotative style or not.
The Style name doesn't have to have the word "annotative" in it - kind of nice, since those style names can get too long to see in the pulldown


The easiest way to have your annotative dimensions always turn out right is to create your viewports and set them to the correct scale first. Now you can lock your viewport from the status bar, with your viewport selected just click on the padlock on the status bar.

Next, use the Maximize Viewport button - also on the status bar - and then you're in model space, as if you jumped through the viewport. You can pan and zoom all you want and it won't change your viewport scale - even if you forgot to lock it. Add your dimensions, and then use the same button to go back to paper space.


Now I've added a new viewport scaled to 1/4" = 1'-0", but notice you can still see the 1/8" scaled dimensions. If you've done this, you might have thought they don't work the way you want them to - not so fast! Look at the bottom of this picture and you'll notice the annotation scale doesn't yet match the VP scale.


It's a simple fix - with the new viewport selected, click on the Annotation Scale flyout, and set it to the proper scale - zip zap zowee, all those dimensions go away. Notice also that the text is now the same height in both windows.


I used Maximize Viewport to go in and add a couple dimensions I want in my 1/4"=1' scaled window. All my dimensions (and text) will print out the same size on the paper! Yeeehaw!*


But what if I want a certain dimension to show in more than one window? There's an easy way, and a way that can really mess you up.

The easy way is to click into the viewport where the dimension already shows, so you're in model space. If you locked it, no worries about messing up your scale! Select the dimension you want to add to a differently scaled viewport, right click, and find "Annotative Object Scales", and then "Add or delete scales." Choosing "Add" will bring you to a dialog box showing all the scales available. Click on the one you want, in my case 1/4"=1'-0", and immediately it shows up in the viewport with that scale.
This is cool beans.


Next time I will show you the way to add more scales to your dimensions and text that can really mess you up if you're not careful! Maybe the title should be "How Not to Use Annotative Annotations".


*Ok, I'm sorry for the yeehaw. Last weekend I brought my son to Nashville for Dukesfest, a car show & reunion for fans of the Dukes of Hazzard TV show, and there was a lot of Yeehaw-ing going on. It was really fun, I have to admit.

Friday, May 25, 2007

New Annotative Scaling in 2008


If you've ever wished you didn't have to create different layers and dimension styles for every different scale of viewport you use, with the new Annotative Feature in AutoCAD 2008, your wish has been granted.

The first step to using this feature is to create an annotative text style. This is as easy as checking the correct box, and typing in the text size you want your text to be in Paperspace - the size you want your text to plot at.


Next, when you start the text command, this dialog box will come up asking you what scale you want your text to display at.


I added some text that I want to display with a height of 3/16" in a viewport scaled to 1/4"=1'-0". I made two viewports, one is at 1/4", the other at 1/8"=1'-0". Notice the text doesn't display at all. I have to click on the viewport and choose a viewport scale.


Now I can see the text in only one viewport


I added more text that I want to be visible in both viewports. I click on the text, right click and choose annotative scale > Add scale.


The existing 1/4" scale shows, and I'm going to add 1/8" scale as well.
Now you'll be able to see this text in both viewports


You can choose to have text that displays at one or more viewport scales, as shown here in this example. The same applies to dimensions - the subject of my next entry.