Wednesday, July 30, 2008

Software Authorization


Our salespeople often get calls from our customers when they have software authorization problems. I'm writing today to address one thing that comes up all the time.

If your Autodesk product won't authorize automatically over the internet, on the form you fill out to authorize via email they'll ask you to fill in your computer's server name and MAC address. Many customers call us wanting help to find these. The more computers have become "user friendly" the less we need to know about the workings behind the scenes, so the less we learn how to work on these kinds of things...

In order to find the server name and MAC address, first you need to get to a command prompt. In Windows XP (and I'm told in Vista too) go to the Start menu and find "Run". When you click on that, you'll get a place to enter a command. Type in "CMD" (with no quotes) and hit enter. This will put you in the old DOS-looking interface. At the prompt, type in "IPCONFIG /ALL" (again without the quotes) and you will see something very like this illustration. The Server name is displayed as Host Name, and the MAC address is displayed as Physical Address.

Write these down, I mean you actually have to use a pen or pencil, and paper, so you'll have them on hand when you contact Autodesk. The MAC address should be written with no dashes or spaces, by the way.
Voilà! as my French friends would say, which is a lot quicker than saying "There you have it" or "Here you go" or "That's it!". "Voilà" is one of the most useful words not in the English language.

This procedure can also be used if you want to obtain a license file before you install the Autodesk License Manager (AdLM) tools - in fact, that's where this information lives on the Autodesk website.
Another little tip - you can get to the C: prompt in Start>All Programs>Accessories if you have Windows XP.

Thursday, July 24, 2008

AutoCAD 2009 Update

Today when I opened my AutoCAD 2009, I received a notice to install an Update, which I thought was curious. I clicked on the link, and read through the Instructions for Updating my Product. At the bottom there was a link that said 'Read Me'. I clicked on it, because I was wondering what exactly an 'update' was. After telling me who should install this update, it had a listing for "Primary Issues Resolved by this Update". Curiouser and curioser. As I read through them, I realized, "Oh! This is a Service Pack!" ( I admit to being a little slow this morning)

I guess a service pack by any other name sounds much more sweet - a little less like fixing what was wrong, and a little more like adding more and better functions.
Here is a link to the Read Me file, which ought to be read. 2009 UPDATE READ ME.

The things that will be improved by this update are:
3D Visual Styles
Annotation Scaling
External References (xref) palette
Raster Images
Partial Open
Plot
Properties Palette
Hatch
Remote text (rtext)

Individual little glitches have been fixed in:
.NET API - Annotation Scaling – Attributes – Blocks - Export a Layout to Model Space - External Reference ESW – Hatch - Hide/Shade - Menu Browser - Multileader (mleader) - Multiline Text (mtext) - Open/Save - Partial Open – Plot - Property Palette – Publish - Quick Properties – Render – RECOVER – Ribbon - Visual LISP - ZOOM

You'll have to go to the Read Me to find out what exactly they changed...

Also, be sure to scroll all the way to the bottom and read the part entitled, "Known Issues with this Update". Your Ribbon customization could be affected after you install Update 1, so you'll want to know what's going to happen, and the work-arounds they list. Last but by no means least, the Read Me has instructions for installing this Update for network installations, so if that's you, be sure to read that.

And here is the link to Update 1, the eagerly awaited service pack for AutoCAD & AutoCAD LT 2009. I hope this slays all the gremlins that live in your computer's 2009 AutoCAD files.

Thursday, July 17, 2008

Quick Properties

Our neighbors have this little black dog named Sassy, she's some sort of a Labrador Retriever mix, and she takes her responsibilities very seriously! She works really hard to be a good watchdog, barking continually at anyone who rides a bike or jogs down the road. Sassy wants to be so helpful, she's always at our door, ready to greet us. If there's a raccoon or coyote in the area, she will bark until it goes away - even if it takes all night! If one of us pulls our car into the driveway, she runs to greet us and then escorts us home. If someone comes by to visit, she's quick to let everyone know there's a stranger here. I appreciate her willingness to always be on task, but it does get to be a bit much.

WhenI was trying out the new Quick Properties, frankly, it reminded me a lot of Sassy. It's good to have, like a more-than-willing watchdog, but it can be annoying.

Unlike Sassy, however, Quick Properties can be turned off whenever you don't want it around.


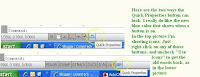
How it works - When the Quick Properties button is on - (these buttons turn blue in 2009 now, what a good idea!) - if you select an object, a smaller version of the properties palette pops up right next to your cursor, with information about that object. 
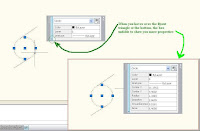
Just like in the normal Properties palette, you can modify the object right there. It's really handy when you need it, and when you don't, just click it off.


Settings
If you right-click on the Quick Properties (from here on out I'm going to abbreviate that to QP) panel and choose "Settings" you 
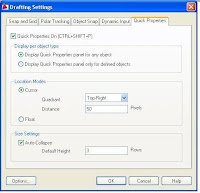
can adjust how this QP panel operates. At the top, decide whether you want to show QP for all object types, or only for defined objects.
The middle section is labeled "Location" and here you can decide where the panel pops up. In Cursor mode, the QP panel pops up relative to the object you selected, and you can enter how many pixels away from your cursor it will be. In Float mode, my personal favorite, the QP panel always displays in the same position on your screen until you manually move it. (Kind of like tying up the dog!)

The bottom section is called Size Settings, and here you type in how many lines the QP panel will show when it first pops up. Any additional properties that you want to see will unfold if you hover over the fly-out triangle.

Customize
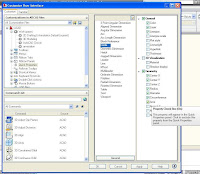
This was well thought out by Autodesk- if you choose "Customize" when you've right-clicked on the QP box, it puts you right into the Customize User Interface dialog box, with the QP section already open for you, creating two columns on the right side of the CUI box. Pretty slick! Whichever object you had selected in your drawing is the one currently showing, with the current properties selected in the farthest right column. You can check whichever properties you really want to see, and uncheck those you don't. Then in the other column, you can also edit any other defined object just by clicking on it. When you select a different defined object, different property choices will show up in the farthest right column, and you can choose which ones to show for every type of object.

I think if you give this a try you'll find it a good tool to have in your repertoire. Set it up so it shows the properties you need to verify the most often, and turn it on whenever you're fixing up someone's drawing. I'm sure Sassy would approve!

Thursday, July 3, 2008

Humor for a Thursday Afternoon

This has been passed around since 1995, but I only got it a week ago. It made me laugh, and since today is a slow last-day-before-a-long-weekend, it seems like a good time to pass it along.

What if Dr. Seuss did Technical Writing?
By Gene Ziegler 1995.

Here's an easy game to play.
Here's an easy thing to say:

If a packet hits a pocket on a socket on a port,

And the bus is interrupted as a very last resort,
And the address of the memory makes your floppy disk abort,
Then the socket packet pocket has an error to report!

If your cursor finds a menu item followed by a dash,
And the double-clicking icon puts your window in the trash,
And your data is corrupted 'cause the index doesn't hash,
Then your situation's hopeless, and your system's gonna crash!

You can't say this?
What a shame sir!
We'll find you
Another game sir.

If the label on the cable on the table at your house,
Says the network is connected to the button on your mouse,
But your packets want to tunnel on another protocol,
That's repeatedly rejected by the printer down the hall,

And your screen is all distorted by the side effects of gauss
So your icons in the window are as wavy as a souse,
Then you may as well reboot and go out with a bang,
'Cause as sure as I'm a poet, the sucker's gonna hang!

When the copy of your floppy's getting sloppy on the disk,
And the microcode instructions cause unnecessary risk,
Then you have to flash your memory and you'll want to RAM your ROM.
Quickly turn off the computer and be sure to tell your mom!


This was sent to me in an email, and I found the author information on the page :
http://www.annexed.net/box/drseuss/drmanuals1.html
There are a lot of other “if Dr. Seuss wrote…” parodies on this site that are really well done!
http://www.annexed.net/box/drseuss/index.html
And please, if anyone knows whether the author I attributed this to is not the right one, please let me know and I'll change it. (Dr. Seuss books were my favorites when I was learning to read)

Friday, June 20, 2008

Layer Properties Manager in 2009

Hello fellow CAD users!
I have a few minutes free on this Friday afternoon, so I thought I'd take the time to talk to you all. I want to tell you about a couple cool new things that the Layers Property Manager does in AutoCAD 2009. In my last post, I mentioned that the Layers Property Manager now will behave just like the other palettes, once you turn it on you can dock it on the side, or anchor it so it pops out only when you hover over it. However, that is not the only improvement.

Another new thing you'll notice is that when you change something in Layer Properties, it is immediately applied to your drawing. You don't have to worry about accidently hitting escape and undoing all your layer changes!

Honestly, one of my pet peeves has always been that when you maximize the columns, you can never read what the column heading is. They fixed that in 2009. If you right-click on any column header in Layer Properties, and choose "Maximize all columns"from the flyout, you will be able to read all the headings. It's wonderful! However, if you don't want to read the headings, choose "Optimize all columns", and they'll only be as wide as the longest word in the column.

If you're not using Layer Filters, there's now a double chevron (arrow) that will let you hide and unhide them. I love that too.
As in 2008, you can still right-click and uncheck any columns that you don't use, to hide them, and rearrange their order by dragging them. Happily, that didn't go away.

In this picture, I've expanded the Layer filters. Do you notice that vertical line after the layer names? Now in 2009, by right-clicking on any column heading, if you choose "freeze column" you can make every column to the left of where you clicked stay locked on the left side, so you can still see them when you slide over to view the columns on the right. Another new feature I really like!

By the way, If you use layer filters a lot, you'll notice now if you expand the Layers panel you can access the layer filters (and named layer states) from there, instead of opening the Layer Properties Manager.
I labeled it in my previous post, but that picture did end up to be pretty busy, so I bet most people didn't even bother trying to figure it out.


Last of all, I want to tell you that if you hate this new function of the Layers Manager being able to stay open, and fly out when you need it, you can change it back to the old way. On your command line, type in LAYERDLGMODE and change it from a 1 to a 0 (zero). I have a picture of it here, so you can be assured that it works! You'll still have all the other new features I've described, except you can't anchor or dock the Layer Manager and leave it open.
Some people just like things the way they are, and don't like it when someone fixes something that's not broken. I completely sympathize. It's for those people that I added this last tip!
Ta-ta for now, I hope to write again soon!

Thursday, June 19, 2008

AutoCAD 2009- Changes Vol. 1

Today is the first post I'm writing about the new features of AutoCAD 2009, but it certainly won't be the last! I've been so busy with training and other things, I keep getting sidetracked from preparing a blog entry. SO my goal is to make them shorter and more frequent... but I think I've said that before. Sorry folks!
First of all, when you open AutoCAD 2009, you know immediately that things have changed. "YIKES! Where did they move my stuff to now?" So, before panic sets in, let's look at how some of you (maybe like someone who would spend a whole day chasing down his/her red stapler, if someone borrowed it), can get things back to the comfortable, familiar interface you know so well.

In the lower right corner, there are now a whole lot of buttons that didn't used to be there. One of them will give you access to your Workspaces. Click that button, highlight "AutoCAD Classic", and you will have the same toolbars as before. The icons on your buttons have changed, some for the better, and some maybe not so much. Perhaps this isn't as comfortable and familiar as we'd like! I truly was attached to the red dynamite on the "Explode" button, it made me feel like Wile E. Coyote from Warner Brothers...now it looks like a box that's flying apart. But we all have to adjust as time goes on. We get older, our hair turns grey, our bodies wear out, and our AutoCAD buttons don't look the same. Life is all about adjusting...


For the more adventurous, the new user interface has some really terrific features. As ever, at first it slows you down when they move tools around, then once you get used to it, you're faster. Seriously, they've done some good rearranging here, and once we get used to it, I think we'll like it.
First of all, there is a big red A in the upper left corner. The flyout right next to that -I circled it in yellow - contains all your pulldown menus, so you can still get to those. Good thing, too, it's the only place I've found "save as".
Each tab across the top has different panels, arranged by task. So, the Home tab has the most-used ommands, the Blocks and References tab has everything you could do with or to a block or an xref, the Annotation tab has every kind of annotation (text, dimensions, tables, etc), the tools tab has stuff for customizing and the new cool Action Recorder, and so on. I'll talk about all of them in future posts.
Let me show you a few things that might help you want to put forth the effort to use the new Ribbon interface. For one thing, they've really put together tools that you use together. I have a picture of all of the ribbons, if you want to look through them and see where your buttons went.


One great thing about the ribbons is that someone finally decided to put things together that went together. I used to always make a custom toolbar that had Define Attribute, Make Block, Block Attribute Manager, etc, all together. All those things are together now, in the Blocks and References tab. You'll find a lot of things like that in the ribbons. Try it, you'll like it. Also, you don't have to drill down through the Pulldowns anymore, commands like Measure, Area, and Circle - Tan, tan, tan are now easy to find on the ribbons.

Take a look at this picture, I cut and pasted a few examples onto one picture to show you different panels extended all the way.


A really good example of the way they've put everything together is the Layers Panel. My picture is pretty busy, I labeled everything there is on that panel. It's got it all!
Hopefully you all can read it.
When you're not drowning in deadlines, give the new 2D Drafting & Annotation Workspace in 2009 a try. You just might like it. I'll be writing to you all again soon with more info, as often as I can in between classes.

Thursday, May 22, 2008

Autodesk Online Tech Support

Customers with Subscription! Have you been utilizing your Autodesk Online Tech Support Service? If not here’s how!
Ask the Contract Manager in your firm to add your name to users that may post online questions.
If your Contract Manager (the one who gets the Autodesk products) has not set up the Subscription service yet, in North America they should call Autodesk customer service at 800-538-6401 and ask to be sent the “Welcome to Subscription" email, that will explain how they can get set up. Once that is done, visit http://pointa.autodesk.com/local/enu/portal/signin.jsp and you’re ready! We have had great reports that the Autodesk online tech service is prompt and knowledgeable.
For our local customers, you are always welcome to call your sales rep at CommTech too, to log a call for you. The reason we want to pass along this information is that often times our techs are in class training, or at a customer site, and they can't respond to you very quickly. We know what it's like to be having computer problems and a deadline looming overhead, and then you can't get hold of anyone to help you!
In other areas of the world, you'll need to ask your local reseller if this service is available from the local language Autodesk website. Your local Autodesk reseller will be able to help you find it. They also can walk you through these steps, to get yourself signed up with Autodesk Online Tech support.

This blog entry was the idea of one of the most wonderful salespeople you ever could have the privilege to meet, our own Lorri Williams. She wrote most of the text, so I want to make sure to give credit where credit is due!