Friday, May 25, 2007

New Annotative Scaling in 2008


If you've ever wished you didn't have to create different layers and dimension styles for every different scale of viewport you use, with the new Annotative Feature in AutoCAD 2008, your wish has been granted.

The first step to using this feature is to create an annotative text style. This is as easy as checking the correct box, and typing in the text size you want your text to be in Paperspace - the size you want your text to plot at.


Next, when you start the text command, this dialog box will come up asking you what scale you want your text to display at.


I added some text that I want to display with a height of 3/16" in a viewport scaled to 1/4"=1'-0". I made two viewports, one is at 1/4", the other at 1/8"=1'-0". Notice the text doesn't display at all. I have to click on the viewport and choose a viewport scale.


Now I can see the text in only one viewport


I added more text that I want to be visible in both viewports. I click on the text, right click and choose annotative scale > Add scale.


The existing 1/4" scale shows, and I'm going to add 1/8" scale as well.
Now you'll be able to see this text in both viewports


You can choose to have text that displays at one or more viewport scales, as shown here in this example. The same applies to dimensions - the subject of my next entry.

Wednesday, May 9, 2007

Widen "View/Edit Corridor Sections"

Here's a question for you, do you use the "View/Edit Corridor Section" command? Well, if you don't, you should. It's a great way to see what's going on at each section of your corridor and gives you the ability to edit each individual section. If you do use it, you may have noticed one of it's limitations. It will only display information for you to the limits of the corridor. For example, you have an assembly that daylights to the existing ground on both sides. Now, the View/Edit Corridor Sections, will only display information up to daylight point. If you want to see more, you could always create a sample line and a section for that station. However, that only works for one of them and creating views for every section sometimes is a waste of time plus, it doesn't help much when you are actually editing the section.

Here's a work around I thought of today. Basically, you simply add data to your assembly out to the area you want displayed.


Here's the method. As you can see in the first picture, I have a section that displays nothing beyond the daylight connection.
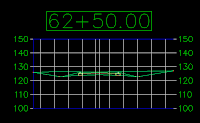


Now, what I want to do is see what the section looks like beyond the tie in points. The trick I use is to add another subassembly to my assembly. This subassembly will extend out a desired distance and the section will display out to the new subassemblies limits. The subassembly I've chosen is LinkOffsetAndSlope. I use an offset distance of 75' for one of them and -75' for the other (offset has no side so negative is left) and a 0% slope. Now, I simly add this to my assembly and I end up with this.


One thing you may notice is those purple (or other colored) lines. The way we get rid of them is to change them in the code set. The first thing we do is assign a specific link to them, I called mine "None" but you can call it whatever you want. This is a property of the subassemblies and can be accessed various ways, I like the properties dialog box personally.
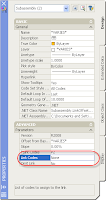


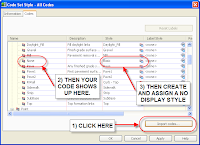
Now we need to add this information into our Code Set Style. Right click on the code set you are using and select edit (code sets are found on the Settings tab of the Tool Space under General->Multipurpose Styles->Code Set Syles). On the Codes tab of the dialog box, down in the lower right corner, there is a button that allows you to import the codes from corridors, assemblies, and subassemblies. Click on this, select your corridor, assembly, or subassembly (doesn't really matter) and the None link code is added to your code set. Now, simply create a link style that doesn't display anything and assign it to your link. Make sure you have your 3D display set to not display anything either.


This is now what your View/Edit Corridor Sections will now look like:
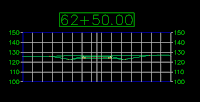


You'll probably want to erase these subassemblies out of your corridor when it comes time to plot your sections.

Tuesday, May 8, 2007

Mask Just One Object


Here's the situation you may find yourself in. You have an alignment that runs from one road to another. You want to display the alignment from the center line of the first road to the centerline of the second road but, you want to show the profile from the Right-of-Way to Right-of-Way. How do I get a piece of the alignment to not show. I know what you are thinking, "Wipeouts!" Wipouts are good but they have their drawbacks. You have to be carefull of draw order because they are indiscriminate little buggers. They wipeout anything and everything below them in the draw order.

Have I got great news for you! Peter Funk brought up an undocumented command in the Discussion Group (if you don't frequent the discussion groups, you really should) a while back. The command is Convertlineworktomaskblock. Yes, that's really the command and, yes, you have to type the entire thing out. Remember, this is an undocumented command. You can create an alias for it but the alias editor doesn't even recognize it as a command.

Ok, back to the problem. In the image below, you can see the situation. We have an alignment that we need for profiling purposes but we don't want to see the entire alignment in plan view.


So, let's create a closed polyline around the area we don't want to see.


And now we'll run our fancy dancy new command, convertlineworktomaskblock. Now this brings up the Convert to Mask Block dialog box. You want select the radio button for "Select AEC Objects to Mask" and check on "Erase layout geometry".


Hit OK, select your alignment, and away you go! Now, pay attention to this, this did not and will not mask out the surface because it is designed to mask out the alignment, and only the alignment, that I selected. It is independent of draw order.

In other words, it's a really cool tool! Once again, thanks has to go out to Peter Funk for this one.

Saturday, May 5, 2007

Map Status Bar in Civil 3D

So, you say your an avid Map 3D user and you've been forced to switch to Civil 3D. You've been told that Civil 3D is built on top of Map and that ALL the functionality of Map is in Civil 3D.

"Yeah right!", you say. "If Civil 3D has all the functionality of Map, where's my status bar?"
Well, have I got good news for you. You can now enable your status bar in Civil 3D. However, I also have some bad news, you have to edit your registry for this one. That's right, you have to hack in your registry but, it's not too hard. Click on your Windows start button and then select Run... In the run dialog box, for the open field, type in "regedit" (without the quotes).

Now, the registry editor is very similar to Windows Explorer. Simply expand out the different sections until you get to the one you need. For this particular purpose, you'll want to edit this key: HKEY_CURRENT_USER\Software\Autodesk\AutoCAD\R17.1\ACAD-6000:409\Appl ications\AcMap

Once you are there, double click on the Statusbar engtry in the right panel and set it's value to 1. Now, before you do this, you should back up your registry but the image below shows you what to change.
Now, the next time you start up Civil 3D, you'll have your precious status bar back.