 We're back from our 2008 Roadshow, demonstrating the new features of AutoCAD 2008 in Denver, Frederick, Cheyenne, Colorado Springs and Pueblo. It went very well, thanks to all of you who attended. In the fall we're traveling to the western slope to demonstrate out there.
I promised to talk a little bit more about Annotative Objects, so here we go.....
This time let's look at some of the pitfalls that can come upon you when adding Annotative objects from Model Space.
First of all, the best practice is to set the scale at which you want your annotative object to display right away, before you start the command. Even though you'll get a reminder screen asking you to set the scale, it's happened to me more than once that the text I put in there
 doesn't get the message and winds up still showing at 1:1 (meaning 1/8" tall in this example, whatever you set as the Paper space text height in the text style). If I go to add or delete scales, I can see that it thinks it's displaying at 1/8"=1', but it's not. So it will be a good habit in 2008 to always check the bottom right of your status bar before you put any annotations in. This will be on the test, so remember it.
Just in case you forgot AutoCAD 101, the  status bar is that very thin bar at the bottom underneath the command line, where you turn off DYN and turn on POLAR.
 status bar is that very thin bar at the bottom underneath the command line, where you turn off DYN and turn on POLAR.
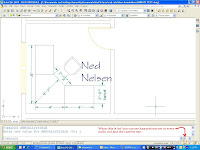
I added some annotative dimensions after setting my scale to 1/2"=1'-0" on the status bar.  Looking at this drawing in Paper space, you can see that the text is showing in the correct viewports and everything is the right size.
 Looking at this drawing in Paper space, you can see that the text is showing in the correct viewports and everything is the right size.
Here is where the errors will occur:
 These two buttons are the ones you have to be careful of. In this picture, they are both 'off''. They both represent system variables, one on the left toggles whether all annotations are visible, or only the ones of the current scale. The command is actually ANNOALLVISIBLE; when set at 0, only the annotations of the current scale show, and the little lightbulb on the icon is dark. When you toggle it, that sets it to 1, and you can see all the annotations of each scale, as in the following picture.
 These two buttons are the ones you have to be careful of. In this picture, they are both 'off''. They both represent system variables, one on the left toggles whether all annotations are visible, or only the ones of the current scale. The command is actually ANNOALLVISIBLE; when set at 0, only the annotations of the current scale show, and the little lightbulb on the icon is dark. When you toggle it, that sets it to 1, and you can see all the annotations of each scale, as in the following picture.
The other button, on the right, is ANNOAUTOSCALE, and it can be set to a negative or positive number, to add quickly another scale to your annotations.
For example, I need another viewport with 1/4" scale, without the existing note & dimensions. Just to show you what can happen when you have the right side button on, (showing the lightning bolt symbol 'on', or yellow), I turned that on (changing the setting from 4 to -4) and in Model space, changed the annotative scale to 1/4"=1'-0". Immediately it added that scale to all my existing text and dimensions.
 This was not exactly what I had in mind!
So be careful of that last little button! If it's on, and you just switch over to a different scale setting to see how things look, you could add that scale to every annotation you have. 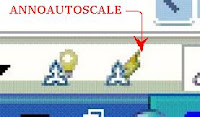

There are 8 different setting for this system variable:
1 Adds the new scale to all annotative objects except those on layers that are off, frozen, locked or set to Viewport Freeze
2 Adds the new scale to all annotative objects except those on layers that are off, frozen or set to Viewport Freeze
3 Adds the new scale to all annotative objects except those on layers that are locked.
4 Adds the new scale to all annotative objects
-1, -2, -3, and -4 Do not add the new scale, and they all return the setting back to their corresponding positive number if you just toggle it. Make sure you look at the command line to see which setting you've got when you use this button!
There's a very old saying, "Forewarned is forearmed". I'm hoping that showing you how these two buttons work will help everyone avoid frustration and encourage you all to use the wonderful new annotative objects in AutoCAD 2008.
See you next time!


